Combat Overview
Let’s start with Pirate Hideout combat. When you have arrived at a Pirate Hideout and hit the BIG RED ‘Clear Hideout’ button, you are placed in the local vicinity of the hideout, and your quest is to destroy as many of the Pirates as you can. There is a finite number of them, and eventually they will decide to bug out, and the Hideout will be destroyed, and if you have a Salvage laser and space in your hold, you can salvage the large wreckage.
You may exit combat whenever you wish. In SAFE Zones, you can exist at will, press the button, and you’re out. In LAWLESS systems, there is a 60-second penalty for exiting combat.
The main combat screen looks like the screen below:
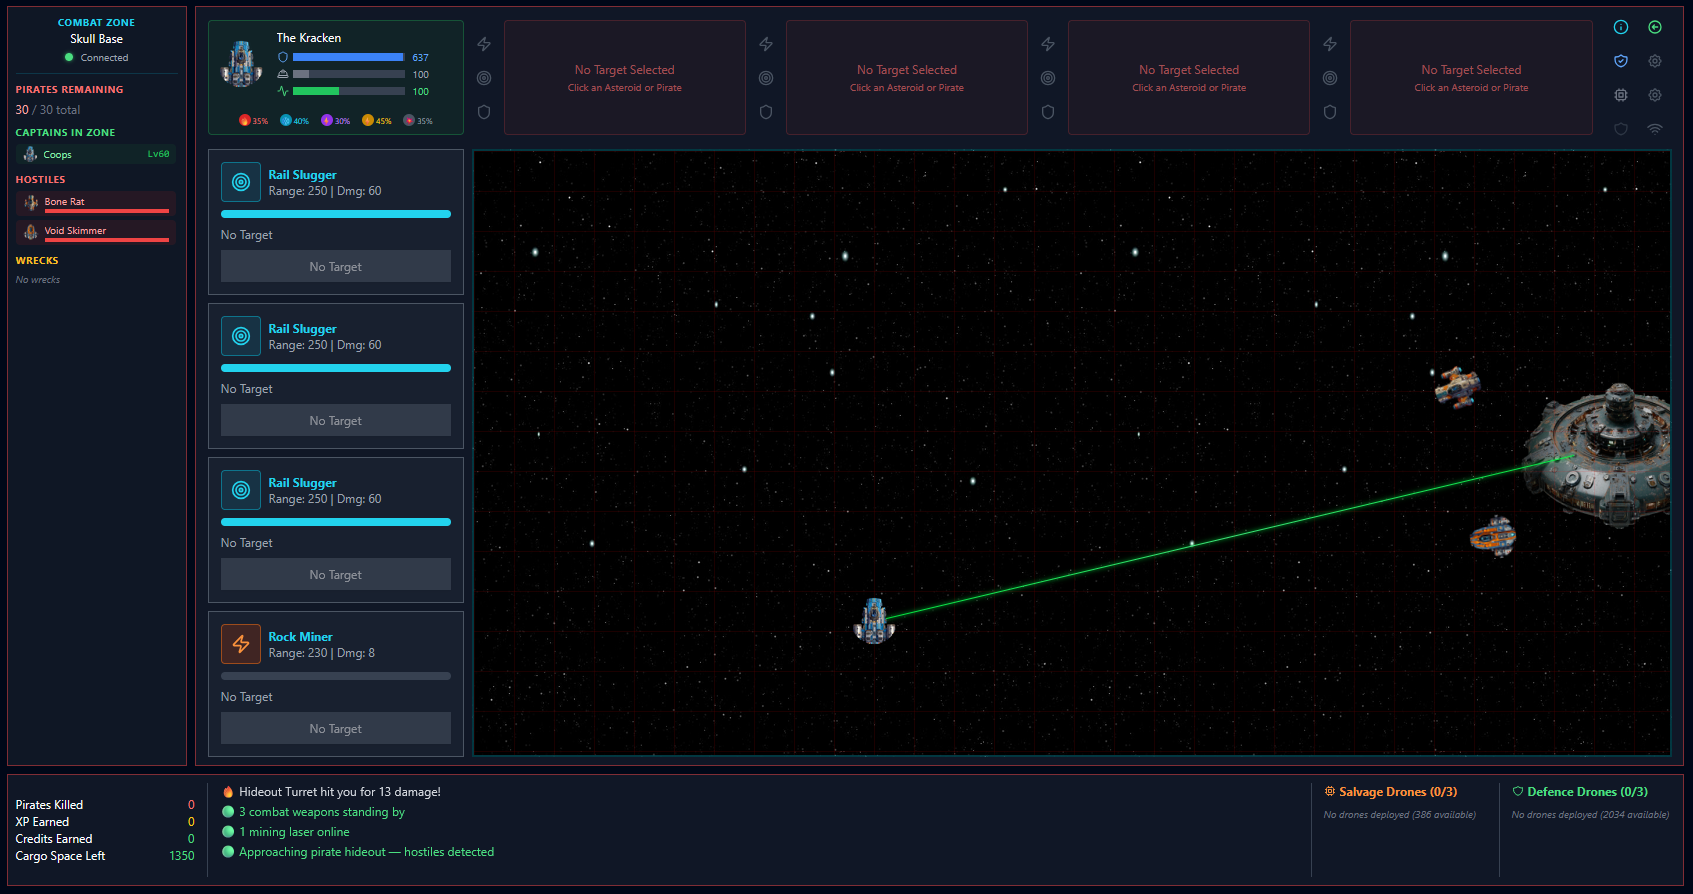
The generated Pirates are based on the local Law level. So, starting areas in Law Level 15 and 14 levels will spawn easy-to-kill ships. The deeper the law level, the more challenging it will get. You will generally spawn in the centre of the screen the bad guys will be assembled on the screen at random locations.
You can see down the left-hand side that this ship has four weapon mounts, and I was sensible enough to load my combat guns, one in each slot.
The next image shows what the weapon panel looks like when I clicked on an empty ship. You can do this by simply clicking on the ship itself in the combat zone or by using the ship listing on the left. Each time you click, the next weapon in your loadout will target the ship. If you wish to target different ships with different weapons, simply click the separate ship images or select from the list on the right.
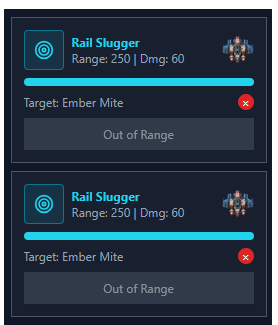 You’ll note my weapons both say ‘Out of range’
By hovering over each weapon, a Green circle will be drawn around my ship. This is the weapons range. You can also see the Range number shown on the weapon.
If you miss-clicked or wish to change targets, simply click the Red X for the weapon you wish to change targets and then re-click the target you want.
The next image shows that I have targeted two different ships, with two weapons on one Ember Flea and one Weapon targeting the Void Skimmer. It is totally up to you how you work, all on one, or one on each. But they must be in range before the ‘Out Of Range’ buttons turn to a Red FIRE.
Clicking on the ships shows their stats; You can make educated decisions on who to attack. Just because the ship ‘looks’ harmless doesn’t mean it doesn’t have a large shield and carry a big gun!

You can also see from the image that we are displaying each ship’s resistance to various weapon damage types. At this stage, we are displaying it, but have not turned it on. As we start to do damage to the ships, you will see these stats degrade. Once you breach their Hull (the green line), they will explode.
Wrecks & Salvage
Killing a ship 99% of the time will produce a Wreck. Wrecks can be salvaged by Salvage Drones. You can launch up to three at a time, but they will return their salvaged goods to your ship’s hold. Keep that in mind. If your hold fills up, they will disengage. Salvage Drones are crafted in Assemblers and sit in the Consumables section of your ship’s inventory.
Movement
Moving around the map is simply a case of clicking a grid cell. Your ship will move automatically. You need to move to maintain range, but once you start moving to a location, you cannot change that destination until you arrive. Some ships will have missiles, keep this in mind and try to select locations that won’t make you
missile fodder.
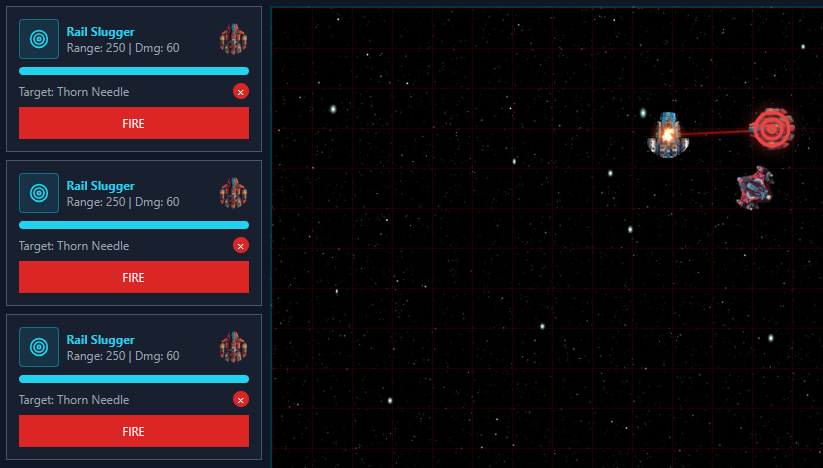
So you chose a target, moved in Range! Great, half the battle, so to speak. I have retargeted three of my Rail Sluggers to all attack one Thorn Needle and moved within range, and all of my weapons now have a RED Fire Button.
Combat General Thoughts
Most Pirates will close within range of you based on their weapon range. If you continuously escape their range, they may switch to firing Stun Missiles. In themselves, they don’t do a lot of damage, but they will stun you for up to Five Seconds if they explode in range of your ship. These types of missiles are fire and forget, so you can dodge them, but if there are 3 or 4 opponents on the screen, that gets messy quickly.
Shield Boosters
Pirates are relentless once locked on and will continue to follow and seek to destroy you! During combat, keep an ever-watchful eye on your Health. Shields are your friend in Forged space, and whilst they won’t regenerate on their own in combat, you can use Shield Boosters. These come in many types, but all boost your shields for X over a period. You must wait for one shield booster to complete its actions before you can use another. The Ship’s AI will always try to use the highest booster you have in your consumables store that you have SKILL to use.
Variations of Combat
There are several different ways of engaging in combat. Some of these are Cooperative IE, where you and others can enter the same location, and some are simply You VS the Pirate or Pirates. The version we showed above is Cooperative, so you can do this on your own or do this with others. That is a combat against a Pirate Outpost. I was the only one there for those screenshots, and there were no wrecks when I took the image.
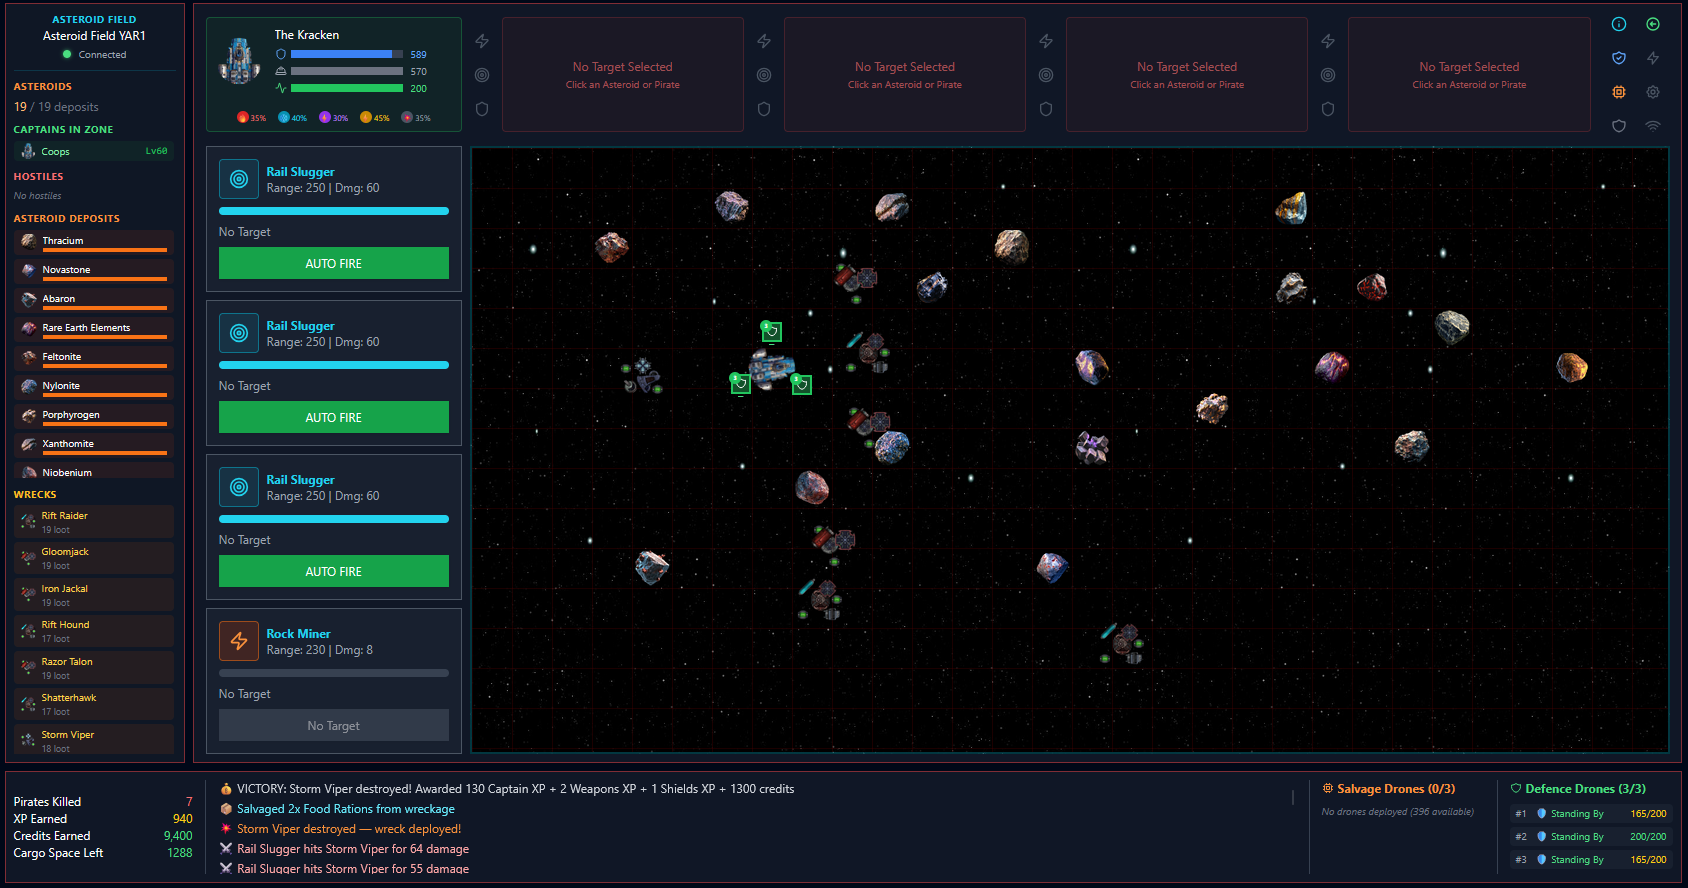
Let’s look at Combat Mining
The screen below is similar but different. I’ve been mining here for a while and destroyed a number of Pirates. You can see their Wrecks listed on the right and their wrecks littering the combat zone. You can also see the Asteroids in the Field. You can click the tarts on the left to lock them in as before in the Pirate Hideout Combat.
This Mining Combat takes place in LAWLESS systems and is cooperative. Should you wish to bring friends or even an Alt.
Mining Defence Drones
Whilst non-Mining Specialised ships can’t use Mining Defence Drones in Outpost combat, you can use them in Mining combat zones. If you have them, deploy them as soon as you enter. They will set themselves up around your ship like a trio of bodyguards. The icon to use these lights up if the criteria are met for deployment, and you have any. Like Shield Boosters, these will be deployed based on the highest level you have skill to use.
As Mining Defence drones get killed, simply click the button to top them up. The AI will always deploy the required amount, keeping you at three whilst you have them to spare. Akin to how Salvage drones work when you leave the Combat zone, they simply self-destruct. Making them a consumable item and living in your Consumables ship store.
Salvage Drones
I have touched on salvage drones above, but it is worth giving them a proper mention. Akin to Shields Boosters, Mining Defence Drones, these are also made in Assemblers. When picked up from the assembler like the others, they go into your ship’s inventory in the Consumables section.
Salvage drones can only be deployed once a Wrecks in on the screen. It doesn’t have to be your wreck, though you may find you might annoy other players if you salvage their wrecks without asking 🙂
In the next picture, you can see my three Salvage Drones have been deployed, they are salvaging and returning the resources and items they find directly to your Ship’s Cargo Store. When that’s full, they will self-destruct. Same if you leave the zone. They are consumable, and you should always stop and think, am I going to get my money’s worth from launching all three. These launch one at a time with a short timeout. They remain active FOR AS LONG as there are wrecks to salvage.
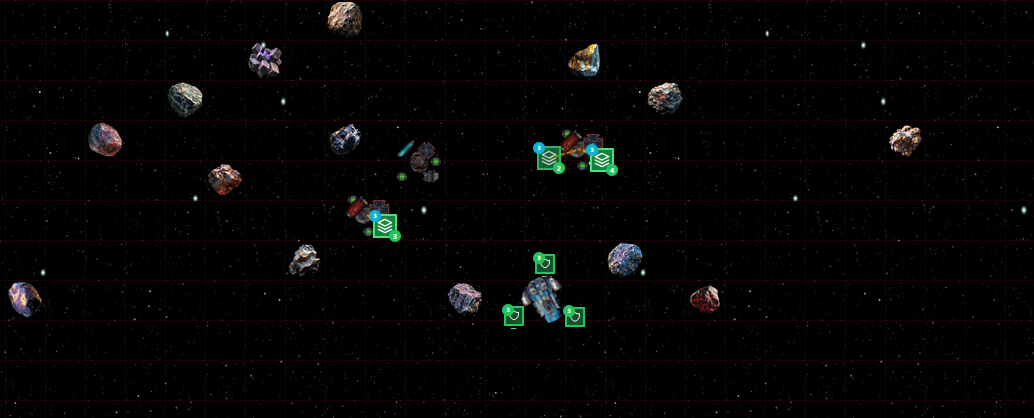
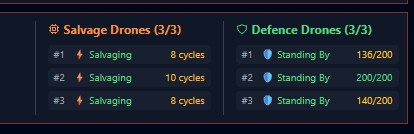
Salvage drones will move from wreck to wreck, salvaging items. What they find is based on two factors. The Law level you’re fighting in, as that defines the Level of the Pirates that find you and the level of the Drone. For the last image, I’d like to draw your attention to the bottom right of the combat zone log. It shows my three Salvage Drones are out and how many Cycles each one has completed. A cycle is an attempt to salvage from the wreck; it is not a given that it will always be successful.
You can also see the status of my Defence Drones, currently they are in Stand By waiting for a target. They auto-lock on anything that acts aggressively at you and fire a green disruptor beam. On the end, you can see each drone’s health. When it reaches Zero the drone will explode and you can deploy another. Remember, once deployed it won’t come back and you can’t take it with you 🙂
Solo Combat
Scanner Combat: You can use the ship’s built-in basic Scanner to scan for ships. By default, it will locate and display any ships up to 1000 units of distance out of a max of 6,000 units. You can click on a Red Pirate target and chase them down and engage in 1:1 combat. Probably the safest way to get used to combat. Escaping if you realise the guy you picked on is going to kick your ass 🙂
Event Combat: Whilst flying around the game, you will have numerous events fire off. Some of these might be combat-based. A pirate may draw alongside you and ask for a bribe to not destroy you. In most instances, you have options, but if you want a fight, call him out; these are also Solo Combat and tend to be 1:1.
Threat Escalation Combat: This one is different in that it’s avoidable if you pay attention. LAWLESS systems have a bar at the top that displays your threat from attack in that system by the local pirates. Mining, carrying passengers, dropping off cargo these all add to their threat. Once it hits 80%, you are open to attack by the local pirates. These are tied to the Law level of the system’s Sun. So keep that in mind, as if you end up in a Law level 5,4, or even lower, you may be in for a hull breach!
Invariably, they will come with friends, and to add to that, they will have missiles and try to trap you to finish you off. If that wasn’t bad enough, you have to survive a full 60 seconds to escape once you hit the escape button. Doesn’t sound like long, does it… lol
Pingback: Pirate Hideouts – Forged Space Guides